Creating a PDF conversion tool using Serverless and Amplify - Part 1 - React App

JonthumbPosted by Jonathan Weyermann on December 5, 2019 at 12:00 AM
Reactjsamp

One of the easiest ways of creating a React app and actually deploying it is to use AWS Amplify. Amplify provides easy hooks into AWS services like Cognito (for authentication) and GraphQL (for database access). For this basic version of the application though, I'll be limiting its use to the api gateway/lambda functionality and easy deployments to s3 and cloudfront it provides.

This part of the tutorial will focus on the front end app. We require a backend that handles the conversion of pdfs into jpgs, handled by a separate lambda. The front end react app will upload a pdf to s3, and will download the finished jpgs.

We need to build the app itself and create an api endpoint from aws that gives us a signed signature in order to be able to upload to the s3 bucket. This is the only write access the front end has to aws resources. It only permits writing pdfs to a specific bucket, and only if the url of the app matches previously accepted URLs. Otherwise a cross-origin error will occur. This prevents an app from any other location from writing to your bucket.


Creating the React App

Following the instructions on Amplify website, the first thing we do is to install Amplify ( https://aws-amplify.github.io/docs/ ) if we dont have it. Then we use to use create-react-app to create a new react app. We will follow steps 1 and 2 on the Amplify instructions site (https://aws-amplify.github.io/docs/js/start), as outlined below

Step 1. Create a New App

Use Create React App to bootstrap your application.

$ npx create-react-app myapp
$ cd myapp

Inside the app directory, install Amplify and run your app:

$ npm install @aws-amplify/api @aws-amplify/pubsub
$ npm start

To install React-specific Amplify UI components, run the following command:

$ npm install aws-amplify-react

See the React Guide for details and usage.

Step 2: Set Up Your Backend

In a terminal window, run the following command (accept defaults is OK, use ‘test’ environment name) from inside your project directory:

$ amplify init        #accept defaults

How it Works: Rather than configuring each service through a constructor or constants file, Amplify supports configuration through a centralized file called aws-exports.js which defines all the regions and service endpoints to communicate. Whenever you run amplify push, this file is automatically created allowing you to focus on your application code. The Amplify CLI will place this file in the appropriate source directory configured with amplify init.

To verify that the CLI is set up for your app, run the following command:

  $ amplify status
  | Category | Resource name | Operation | Provider plugin |
  | -------- | ------------- | --------- | --------------- |

The CLI displays a status table with no resources listed. As you add feature categories to your app, backend resources created for your app are listed in this table.


Creating the Api Endpoint for Secure Signature

Then we use Amplify to add the api endpoint and accompanying lambda (we need this in order to get a secure signature to upload our pdf to s3)

[jonathan:~/src/myapp] master(+15/-0)* 7s ± amplify add api
? Please select from one of the below mentioned services REST
? Provide a friendly name for your resource to be used as a label for this category in the project: devpdf
? Provide a path (e.g., /items) /devpdfs
? Choose a Lambda source Create a new Lambda function
? Provide a friendly name for your resource to be used as a label for this category in the project: devpdf
? Provide the AWS Lambda function name: devpdf
? Choose the function template that you want to use: Serverless express function (Integration with Amazon API Gateway)
? Do you want to access other resources created in this project from your Lambda function? No
? Do you want to edit the local lambda function now? No
Please edit the file in your editor: /home/jonathan/src/myapp/amplify/backend/function/devpdf/src/index.js
? Restrict API access No
? Do you want to add another path? No
Successfully added resource devpdf locally


Amplify actually creates a file tree that looks like this

amplify
->backend
  ->function
    ->devpdf
      ->src
          app.js
          event.js
          index.js
          package.json
        ...

While amplify ask you if you want to modify app.js, the file you need to worry about is index.js

Add the bold code below to index.js:

...
var aws = require('aws-sdk');
const S3_BUCKET = 'quiztrainer-quiz-images-dev'
const exec = require('await-exec')
...
// Enable CORS for all methods
app.use(function(req, res, next) {
res.header("Access-Control-Allow-Origin", "http://localhost:3000")
res.header("Access-Control-Allow-Headers", "Origin, X-Requested-With, Content-Type, Accept")
res.header("Access-Control-Allow-Credentials", "true")
next()
});
...
/****************************
* Example post method *
****************************/

app.post('/devpdfs', function(req, res) {
  const s3 = new aws.S3({ signatureVersion: 'v4'});
  var fileName = req.body.fileName;
  var fileType = req.body.fileType;
  if (fileType == "PDF") {
    fileType = "application/pdf";
  }

  // Set up the payload of what we are sending to the S3 api
  const s3Params = {
    Bucket: S3_BUCKET,
    Key: `pdfs/${fileName}`,
    Expires: 500,
    ContentType: fileType,
    ACL: 'public-read'
  };

  console.log(`params: ${s3Params}`);
  // Make a request to the S3 API to get a signed URL which we can use to upload our file
  s3.getSignedUrl('putObject', s3Params, (err, data) => {
    if(err){
      console.log(`err: ${err}`);
      res.json({failure: 'post call failed', err: err});
    }
    // Data payload of what we are sending back, the url of the signedRequest and a URL where we can access the content after its saved.
    const returnData = {
      signedRequest: data,
      url: `https://${S3_BUCKET}.s3.amazonaws.com/pdfs/${fileName}`
    };
    // Send it all back
    res.json({success: 'post call succeed!', url: returnData.url, body: returnData});
  });
});

app.post('/devpdfs/*', function(req, res) {
// Add your code here
res.json({success: 'post call succeed!', url: req.url, body: req.body})
});

/****************************
* Example put method *
****************************/

...

We point to the localhost:3000 (development) version of our app and the dev version of the bucket that we'll create with serverless. It returns a signed url for the S3 PDF upload when a POST request is made (since this is a lambda that will be run inside aws, we don't need any aws credentials here)

We will also need to add localhost:3000 as the cross origin domain to the api endpoint itself. To do this, we can change the amplify cloudformation script at amplify/backend/api/devapi/devapi-cloudformation-template.json, seen below

...
"/devpdfs": {
...
"x-amazon-apigateway-integration": {
  "responses": {
    "default": {
      "statusCode": "200",
      "responseParameters": {
        "method.response.header.Access-Control-Allow-Methods": "'DELETE,GET,HEAD,OPTIONS,PATCH,POST,PUT'",
        "method.response.header.Access-Control-Allow-Headers": "'Content-Type,X-Amz-Date,Authorization,X-Api-Key,X-Amz-Security-Token,X-Amz-User-Agent'",
        "method.response.header.Access-Control-Allow-Origin": "'http://localhost:3000'"
      }
    }
  },
...

Amplify doesn't seem to create a stage for you at this point, so you will still have to go into API Gateway to manually create a stage. Otherwise the api endpoint we will need to hit doesn't exist.


Writing our React App

The app we're creating looks something like this.

Pdfapp

There is a live version of the app at https://pdf2jpgs.com

The file stucture created by create-react-app looks like this. The first file we will change in the app is App.js. It will contain the app header, and will delegate the main part of the app to the Main components and some other minor components. 

Appjs

First, let's write the code for our App.js. In here, we basically just have our header, and our react router, and some minor bits of logic.

First we have our imports, and our App components, and just one state object which immediately grabs all existing uploads. For this app, were just using local storage to persist the locations of our file uploads. Future versions will allow the user to create an account which will allow them to tie their uploads to their profile, but for this version, it will merely be tied to their current device.

import React, { Component } from 'react';
import './App.css';
import Main from './components/Main'
import About from './components/About'
import axios from 'axios'
import Amplify from 'aws-amplify';
import awsmobile from './aws-exports';
import FileStatus from './util/FileStatus'
import { Navbar, NavDropdown, Nav } from 'react-bootstrap';
import { Router, Switch, Route } from "react-router-dom";
import { library } from '@fortawesome/fontawesome-svg-core'
import { faDownload } from '@fortawesome/free-solid-svg-icons' 
import { createBrowserHistory } from 'history';
require('dotenv').config() library.add(faDownload)
Amplify.configure(awsmobile);
axios.defaults.withCredentials = true
const history = createBrowserHistory();

class App extends Component { 
  constructor(props) { 
    super(props);
    this.state = { 
      previous_uploads: this.grabPreviousUploads()
    } 
    
    this._isMounted = false;
    this.grabPreviousUploads = this.grabPreviousUploads.bind(this); 
  }


grabPreviousUploads grabs information about the previously uploaded files from localStorage

grabPreviousUploads = () => {
  if (localStorage.getItem('previous_uploads')) {
    var prev_uploads = JSON.parse(localStorage.getItem('previous_uploads'))
    var valid_uploads = prev_uploads.filter(this.checkPdfFileExistance);
    localStorage.setItem('previous_uploads', JSON.stringify(valid_uploads))
    return JSON.parse(localStorage.getItem('previous_uploads'));
  }
  else {
    return []
  }
}

checkPdfFileExistance = (upload) => {
  return (FileStatus(`${imageBucket}pdfs/${upload.s3SafeFileName}`)===200)
}


Here is the header code. Notice I'm using bootstrap to create a Navbar. Notice I'm using the content of this.state.previous_uploads which I grabbed in the constructor to populate the previous uploads dropdown

header = () => {
  return (
    <Navbar className="navbar-dark" expand="sm" >
      <Navbar.Brand href="#home">PDF 2 Image</Navbar.Brand>
      <Navbar.Toggle aria-controls="basic-navbar-nav" />
      <Navbar.Collapse id="basic-navbar-nav">
        <Nav className="mr-auto">
          <Nav.Link href="/">Home</Nav.Link>
          <NavDropdown title="Previous PDFs" id="basic-nav-dropdown">
            {
              this.state.previous_uploads.map((item, i) => {
                return (<NavDropdown.Item key={i} href={`/uploaded/${i}`} state={ {item: item}}>{item["uploadFileName"]}</NavDropdown.Item>)
              })
            }
            { this.dropDownNav() }
          </NavDropdown>
          <Nav.Link href="/about">About</Nav.Link>
        </Nav>
      </Navbar.Collapse>
    </Navbar>
  )
}


as you can see above, there is a dropDownNav() method, which I use to display the option to drop all records of previous uploads if previous uploads exist

dropDownNav = () => {
  {
    if (this.state.previous_uploads.length>0){
      return (<React.Fragment>
                <NavDropdown.Divider />
                <NavDropdown.Item onClick={this.dropUploads}>Drop Previous Uploads</NavDropdown.Item>
              </React.Fragment>)
    }
  }
}


Dropdown

Here is a callback method I use to update "Previous PDSs" once a new (or existing) pdf has been uploaded, and to redirect to the new url we've created with it

previous_uploads_update = (index) => {
  this.setState({previous_uploads: this.grabPreviousUploads()})
  if (index === -1) { index = this.state.previous_uploads.length-1 };
  history.push(`/uploaded/${index}`);
}


And here is the main render method that calls the header and  builds our main router will all potential URLs.

render() {
  return (
    <Router history={history}>
      <div className="App">
        <header className="App-header">
          { this.header() }
        </header>
        <div>
          <Switch>
            <Route path="/about" component={About} />
            <Route path="/uploaded/:index">
              <Main previous_uploads={this.state.previous_uploads} previous_uploads_update={this.previous_uploads_update} />
            </Route>
            <Route path="/">
              <Main previous_uploads={this.state.previous_uploads} previous_uploads_update={this.previous_uploads_update} />
            </Route>
          </Switch>
        </div>
      </div>
    </Router>
  );
}


As you can see, there are only 3 main routes. The root route '/', which allows the uploading of pds, and doesnt show anything initially. Then we have /uploaded/(upload_id), which has all the previously uploaded pdfs, and the /about route, which has a brief description of the author (myself in this case). For a complete rundown on react routers, you can see React-router-dom.


For the full source code of <App>, check the source code on github


FileStatus.js

Just a small utlity file that checks if a file exists

export default function FileStatus(path) {
  try {
    var http = new XMLHttpRequest();
    http.open('HEAD', path, false);
    http.send();
    return http.status;
  } catch (err) {
    console.log(`err: ${err}`);
    return null;
  }
}


<Main> Component

Both the root route and the /uploaded route point to the <Main> component. There a number of imports you will need for file, which you can see in the full source code. The main component has a number of different states.

class Main extends Component {
  constructor(props) {
  super(props);
  this.state = {
    images: [],    //will hold the location of all the images on the current page (takes pagination into account)
    fileName: "",   //base file name being uploaded including .pdf
    numPages: "",   //the number of pages in the pdf
    uploadFileType: "",   //the base file name without extension - we use this to display it in the previous pdf menu
    uploadFile: "",   // 'pdf'
    uploadFileName: "",   //will hold a file object for processing
    s3SafeFileName: "",   //Generated from the regular Filename. We strip strip unsafe characters (s3 can pretty much only handle alphanumeric characters in a bucket) and add an user identifier so we can store all pdfs in the same folder and still know which user uploaded it
    fileState: this.fileState.base,
    firstPage: 1,    // first page currently being displayed
    lastPage: pagesToDisplay,     // last page currently being displayed
    errorMessage: "" // we have the capability to display an error message here
  };
}

fileState = {
  base: 'none',
  analyzing: 'analyzing',
  uploading: 'uploading',
  uploaded: 'uploaded'
}

The states mostly exist to track the names and locations of files the app need to keep track of. The state of the file upload itself is in fileState, for which there are 4 states, which I'm representing with a string stored in fileState.


File States:

  • base: state before anything is uploaded
  • analyzing: state we set to true after the user clicks the button and we need to determine how many pages there are in the pdf
  • uploading: the state we set after analyzing, once we've determined how many pages there are
  • uploaded: state we set to true when we've uploaded the pdf and we're waiting for images


The main render method shows all the main page elements. I will explain these in further detail below

render() {
  return (
    <React.Fragment>
      <div>
        {this.state.errorMessage ? this.errorMessage() : null }
        {this.fileStateSwitch(this.state.fileState)}
      </div>
      <Container>
        {this.controlsBar()}
        {this.state.fileState===this.fileState.base ? this.features() : null }
      </Container>
    </React.Fragment>
  )
}


Errormessage - a method for our error messages

errorMessage = () => {
  return (
    <div className="error-message">{this.state.errorMessage}</div>
  )
}


fileStateSwitch - A switch statement that renders certain components depending on the state of the file upload. For instance, the description disappears after the upload begins. The numPages method is only displayed while the uploading occurs.

fileStateSwitch = (fileState) => {
  switch(fileState) {
    case this.fileState.base:
      return this.description();
    case this.fileState.analyzing:
      return this.documentAnalize();
    case this.fileState.uploading:
      return (<React.Fragment>
                <S3Upload data={this.state} setToSuccess={this.setToSuccess} />
                { this.state.numPages ? this.numPagesDisplay() : null }
              </React.Fragment>)
    case this.fileState.uploaded:
      return (<PdfImages data={this.state} handlePageClick={this.handlePageClick} />)
    default:
      return this.description();
  }
}


controlsBar - a grouping of buttons - Allows you to choose and file and upload it. also displays the zip file once it's ready for download

Controlsbar

controlsBar = () => {
  return (
    <React.Fragment>
      {this.state.fileState===this.fileState.uploaded ? (<Zip addToPreviousUploads={() => this.addToPreviousUploads()} fileName={`${process.env.REACT_APP_IMAGE_BUCKET}${this.state.s3SafeFileName.split('.')[0]}.zip`} />) : null}
      <input className='btn btn-success input-padding' value={this.state.fileName} onChange={this.handleChange} ref={(ref) => { this.uploadInput = ref; }} type="file" accept=".pdf"/>
      <Button onClick={this.pdfUpload} disabled={!this.state.fileName} className='convert-button-padding'>Convert to JPG Images</Button>
    </React.Fragment>
  )
}

controlsBar contains PdfUpload - A method called right when the user clicks the upload button. Just sets up the states for analysis and eventual upload

pdfUpload = () => {
  let file = this.uploadInput.files[0];
  let fileParts = this.uploadInput.files[0].name.split('.');
  let fileName = fileParts[0];
  let fileType = fileParts[1];
  this.setState({fileState: this.fileState.analyzing, errorMessage: "", uploadFile:file, s3SafeFileName: `${this.localIdentifier('pcid')}${file.name.replace(/[^0-9a-zA-Z_.]/g, '')}`, uploadFileType:fileType,uploadFileName:fileName})
}

controlsbar also contains addToPreviousUploads - the method is called after the zip file is generated and discovered by the app. It is used to persist necessary information about the location of the zip file and images in s3 so it can be recalled later.

We also check here if the file was previously uploaded, and only give it a new ID if it's a new file that wasnt previously uploaded.

addToPreviousUploads = () => {
  var prev_uploads = this.props.previous_uploads;
  var found = prev_uploads.findIndex((upload) => {
    return (upload.uploadFileName === this.state.uploadFileName && upload.numPages === this.state.numPages)
  });
  if (found === -1) {
    prev_uploads.push({uploadFileName: this.state.uploadFileName, numPages: this.state.numPages, s3SafeFileName: this.state.s3SafeFileName})
    this.saveLocal('previous_uploads', JSON.stringify(prev_uploads))
  }
  this.props.previous_uploads_update(found)
}


features is basically a text method that explains app features

features = () => {
  return (
    <React.Fragment>
      <div><img className="image-style" src="/upload.gif" /></div>
      <Row>
        <Col xs="12" className='center heading-font-plus'>Features</Col>
        <Col md="4" className='mt2'><h4>Download a ZIP Archive</h4>
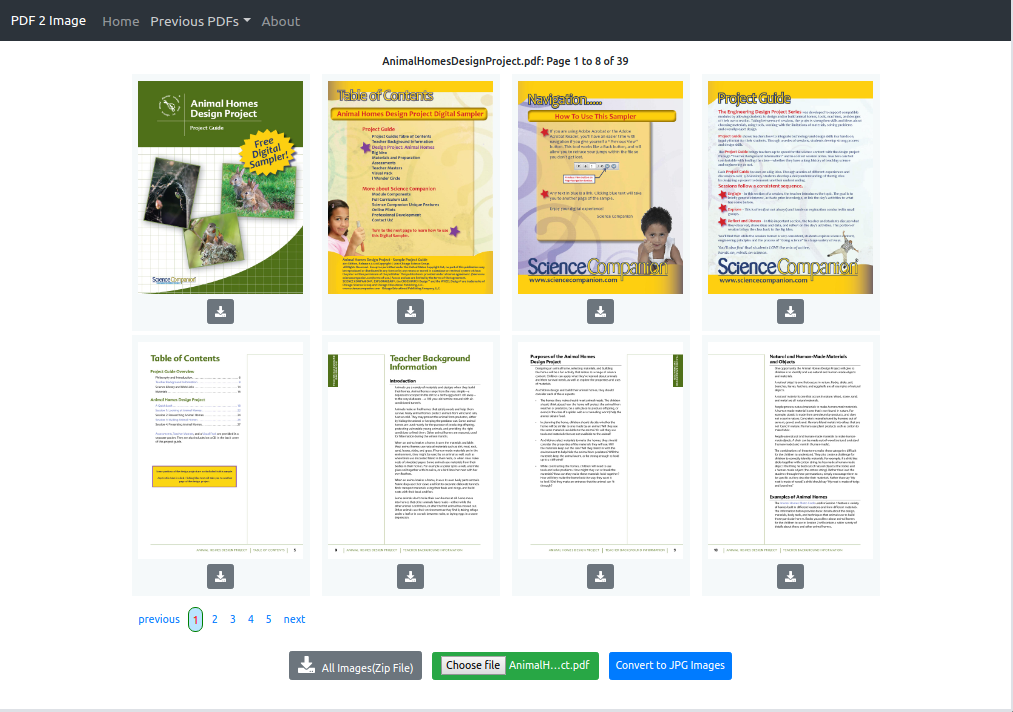
          You can download each image individually by clicking on the download button below each image,
          or you can download a ZIP file containing all the images.
        </Col>
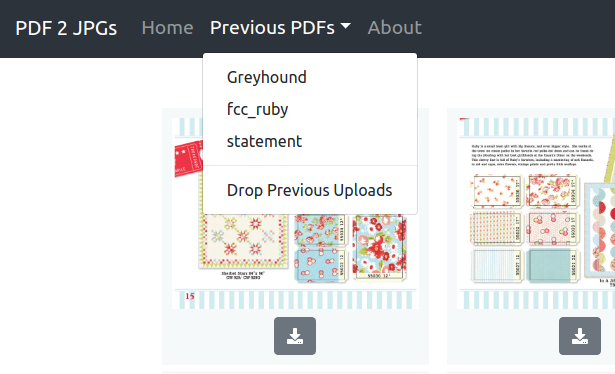
        <Col md="4" className='mt2'><h4>Access your previously uploaded PDFs</h4>
          Previously uploaded PDFs are will be available to be viewed and downloaded again on the same computer. Images and PDFs and
          ZIP files are stored on the server for 30 days before they are erased.
        </Col>
        <Col md="4" className='mt2'><h4>Full Size Image Viewer</h4>
          Click on the image to open the image full size. You'll be able to download, rotate or see an
          even bigger version of the image.
        </Col>  
      </Row>
    </React.Fragment>
  )
}


Methods inside fileStateSwitch

Description is a text only methods that describe the app - this one is displayed in the base state

description = () => {
  return (
    <div className="main-style">
      <Container>
        <div className="tight-container">
        <div className='center heading-font'>Convert a PDF file to a set of optimized JPG images</div>
        <div className="mt2 sub-heading-font">This free tool converts PDFs to JPGs. It shows thumbnails of each page so you can easily enlarge and download only the files you wish to download</div>
        <div className="mt2 sub-heading-font">Click the 'Choose File' button and select a PDF file you wish to convert. Click 'Convert to JPG images' and wait for the conversion process to finish.</div>
        </div>
      </Container>
    </div>
  )
}


DocumentAnalyze represents our analyze step where we use react-pdf to load the pdf in order to grab our pdf page count

documentAnalize = () => {
  return (
    <div>
      <Document
        file={this.uploadInput.files[0] }
        onLoadSuccess={this.onDocumentLoad.bind(this)}
      >
      </Document>
    </div>
  )
}

onDocumentLoad = ({numPages}) => {
  this.setState({ numPages, fileState: this.fileState.uploading });
}


NumPagesDisplay is a display of how many pages the pdf has. We only display this in the intern between when we're generating jpgs

documentAnalize = () => {
  return (
    <divmentLoad = ({numPages}) => {
  this.setState({ numPages, fileState: this.fileState.uploading });
}

as for PDFImages and S3Upload, I will explain them in a futher tutorial, but they are available on github


Additional Methods in <Main>

we use the following method to create a random variable to identify the current user. Once we've created the variable, it will be saved in local storage and not recreated if it already exists. It helps us to not only ensure we assign only 1 identifier to a browser, but also keeps a user's file uploads separate, even if the name of their pdf's is the same. 

localIdentifier = (id) => {
  if (localStorage.getItem(id)) {
    return localStorage.getItem(id);
  }
  else {
    var randomNumber = Math.floor(Math.random() * 100000000);
    localStorage.setItem(id, randomNumber);
    return randomNumber;
  }
}


We also have the react life cylce method componentDidMount. We're using it to check if our current url is pointing to a previously uploaded pdf, and loading it if it is actually still present on the server. If were pointing to a route we dont have a file for anymore, we throw an error.

componentDidMount = () => {
  const { previous_uploads, params } = this.props;

  if ( previous_uploads.length > 0 && this.props.params.index !== undefined) {
    let { uploadFileName, numPages, s3SafeFileName} = previous_uploads[params.index];
    var imgs = [];
    for(var index=1;index <= Math.min(pagesToDisplay,numPages) ;index++){
      imgs.push(`${process.env.REACT_APP_IMAGE_BUCKET}${s3SafeFileName.split('.')[0]}/image${index}.jpg`);
    }
    if (FileStatus(`${process.env.REACT_APP_IMAGE_BUCKET}pdfs/${s3SafeFileName}`)===200) {
      this.setState({fileState: this.fileState.uploaded, images: imgs, firstPage: 1, lastPage: Math.min(pagesToDisplay,numPages), uploadFileName, numPages, s3SafeFileName})
    } else {
      this.setState({errorMessage: "Can't find pdf - server probably deleted it"})
    }
  }
}


handlePageClick is called on a pagination click. It is called from a sub-component (PDFImages). It sets the images state to the link of the images to be displayed on the clicked on page, and also updates the page numbers on that pagination page

handlePageClick = data => {
  let offset = data.selected * pagesToDisplay;
  var imgs = []
  for(var index=1+offset;index <= Math.min(pagesToDisplay+offset,this.state.numPages); index++){
    imgs.push(`${process.env.REACT_APP_IMAGE_BUCKET}${this.state.s3SafeFileName.split('.')[0]}/image${index}.jpg`);
  }
  this.setState({images: imgs, firstPage: 1+offset, lastPage: Math.min(pagesToDisplay+offset,this.state.numPages)})
}


the saveLocal method just a wrapper around our current local storage implementation, in case change it in the future.

saveLocal = (id,prev_uploads) => {
  localStorage.setItem(id,prev_uploads)
}


setToSuccess - the method our s3 uploader calls to set the states after our upload is complete (this will trigger our backend function with an s3 hook, and we can load our image frames, but we will still have to display a loader while our backend does its work)

setToSuccess = (imgs) => {
  this.setState({fileState: this.fileState.uploaded, images: imgs, firstPage: 1, lastPage: Math.min(pagesToDisplay,this.state.numPages)});
}


Handle change - A method used for setting the state after the user selects a pdf (used to display the name of the selected pdf)

handleChange = (ev) => {
  this.setState({fileName : ev.target.value});
}


I may have a follow up tutorial explaining the smaller components, but for now you can just reference them on the app's github repo.

User

ieprzgibnsMay 25 2021 at 6:38 PM

Creating a PDF conversion tool using Serverless and Amplify - Part 1 - React App - Jonathan Weyermann <a href="http://www.gyn7x40j9uqu124ik575u69v52tt35sqs.org/">aieprzgibns</a> ieprzgibns http://www.gyn7x40j9uqu124ik575u69v52tt35sqs.org/ [url=http://www.gyn7x40j9uqu124ik575u69v52tt35sqs.org/]uieprzgibns[/url]
Reply
User

xxkfijvmSeptember 20 2021 at 3:53 AM

Creating a PDF conversion tool using Serverless and Amplify - Part 1 - React App - Jonathan Weyermann <a href="http://www.g4z9y0j21hwwz53zv3rxw5br961o7176s.org/">axxkfijvm</a> [url=http://www.g4z9y0j21hwwz53zv3rxw5br961o7176s.org/]uxxkfijvm[/url] xxkfijvm http://www.g4z9y0j21hwwz53zv3rxw5br961o7176s.org/
Reply
User

cnlgxerzjOctober 27 2021 at 10:19 AM

Creating a PDF conversion tool using Serverless and Amplify - Part 1 - React App - Jonathan Weyermann <a href="http://www.g9u9m0945s16e34z3yrj2j901wkysxv6s.org/">acnlgxerzj</a> cnlgxerzj http://www.g9u9m0945s16e34z3yrj2j901wkysxv6s.org/ [url=http://www.g9u9m0945s16e34z3yrj2j901wkysxv6s.org/]ucnlgxerzj[/url]
Reply
User

kmzinfntsxOctober 31 2021 at 3:54 AM

Creating a PDF conversion tool using Serverless and Amplify - Part 1 - React App - Jonathan Weyermann kmzinfntsx http://www.g5zewx48z94vh2c6235v5xgsh279pd29s.org/ [url=http://www.g5zewx48z94vh2c6235v5xgsh279pd29s.org/]ukmzinfntsx[/url] <a href="http://www.g5zewx48z94vh2c6235v5xgsh279pd29s.org/">akmzinfntsx</a>
Reply
User

qlggirceytDecember 24 2021 at 11:11 AM

Creating a PDF conversion tool using Serverless and Amplify - Part 1 - React App - Jonathan Weyermann [url=http://www.g623h31rxz44wpmpm07m666uq32tn24ws.org/]uqlggirceyt[/url] qlggirceyt http://www.g623h31rxz44wpmpm07m666uq32tn24ws.org/ <a href="http://www.g623h31rxz44wpmpm07m666uq32tn24ws.org/">aqlggirceyt</a>
Reply
User

qddkbpnMay 20 2022 at 2:23 AM

Creating a PDF conversion tool using Serverless and Amplify - Part 1 - React App - Jonathan Weyermann qddkbpn http://www.gn9qk852j24m2j9xf30914oy9w1qwo1vs.org/ <a href="http://www.gn9qk852j24m2j9xf30914oy9w1qwo1vs.org/">aqddkbpn</a> [url=http://www.gn9qk852j24m2j9xf30914oy9w1qwo1vs.org/]uqddkbpn[/url]
Reply
User

bjhnynpAugust 7 2022 at 5:21 AM

Creating a PDF conversion tool using Serverless and Amplify - Part 1 - React App - Jonathan Weyermann [url=http://www.g2l1qr40o15lzjh5457zsdv75q4u4j68s.org/]ubjhnynp[/url] bjhnynp http://www.g2l1qr40o15lzjh5457zsdv75q4u4j68s.org/ <a href="http://www.g2l1qr40o15lzjh5457zsdv75q4u4j68s.org/">abjhnynp</a>
Reply
User

eehvewclwJanuary 21 2024 at 12:36 PM

Creating a PDF conversion tool using Serverless and Amplify - Part 1 - React App - Jonathan Weyermann <a href="http://www.gl1etmi47095ciz2khd34in5l90b7025s.org/">aeehvewclw</a> eehvewclw http://www.gl1etmi47095ciz2khd34in5l90b7025s.org/ [url=http://www.gl1etmi47095ciz2khd34in5l90b7025s.org/]ueehvewclw[/url]
Reply

Replying to comment qlggirceytDecember 24 2021 at 11:11 AM